A weak car battery can leave you stuck anywhere—outside an office, at a mall parking, or even on a highway. That’s why knowing how to use a car battery tester is one of the simplest skills every car owner should learn. A battery tester (or battery meter) tells you whether your battery is healthy, weak, or needs immediate replacement. In this guide, you will learn a simple, step-by-step method to check your battery using a tester at home without any confusion. Today, many drivers search for easy ways to diagnose car issues before visiting a mechanic. A car battery tester is one of the most helpful tools, especially when your car shows slow cranking, dim headlights, or electrical issues. Let’s understand everything in detail.
What Is a Car Battery Tester?
A car battery tester is a small diagnostic device that measures your battery’s voltage and health level. It shows you whether the battery is charging properly, undercharging, or completely dying. Some testers also show cranking power and alternator performance. If you ever searched “how to use battery meter” or “battery voltage checker guide”, you’re basically looking for the exact steps that we will explain below.
Why Should You Use a Battery Voltage Checker?
- Tells you the real condition of the battery
- Helps avoid sudden breakdowns
- Saves money by avoiding unnecessary replacement
- Let's check the alternator charging
- Helps you keep track of battery ageing
- Gives a clear reading within seconds
Most importantly, this simple test helps you know if the battery is the main reason behind your car's starting problem or not.
Things You Need Before Testing the Battery
Before using the tester, keep these in mind:
- Park the car on a flat surface
- Turn OFF the ignition and remove the key
- Open the bonnet safely
- Ensure battery terminals are clean
- Keep gloves for protection
Now let’s move to the main part—how to use a car battery tester step-by-step.
Step-by-Step Guide: How to Use a Car Battery Tester
Using a battery tester is very simple. Just follow these steps, and you will get an accurate reading every time.
Step 1: Locate Your Car Battery
- Most cars have the battery in the engine bay, but some cars (like luxury sedans or SUVs) keep it in the boot section. Once you locate it, make sure the terminals are visible and not corroded. If there’s dust or minor rust, clean it gently.
Step 2: Turn Off the Car Completely
- Keep the car ignition fully off. Do not test while the engine is running unless your tester has a special alternator testing mode. Testing with ignition ON can give wrong voltage results and in some rare cases, may cause a spark.
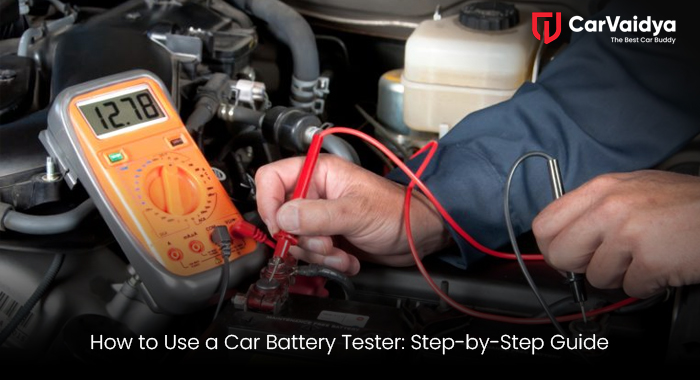
Step 3: Attach the Tester Clamps Correctly
A battery voltage checker usually has two clamps:
- Red clamp → Positive terminal (+)
- Black clamp → Negative terminal (–)
Connect these clamps exactly in this order. Loose connections can cause flickering readings, so make sure they’re firmly attached.
Step 4: Read the Tester Display
Once connected, the screen shows your battery voltage. Here’s a quick idea of what the readings mean:
- 12.6V – 12.8V: Battery is fully charged
- 12.4V – 12.5V: Battery is moderately charged
- 12.2V – 12.3V: Battery is weak, needs attention
- Below 12V: Battery is almost dead
- 13.7V – 14.7V (if engine running): Alternator charging correctly
These values help you know exactly what’s happening with your battery.
Step 5: Perform a Cranking Test (Optional but Useful)
Some advanced testers allow you to check how your battery performs during engine start. For this:
- Keep the tester connected
- Ask someone to start the engine
- Watch the voltage drop
If the voltage drops below 9.6V, the battery may be weak.
This step gives a more realistic idea of battery condition.
Step 6: Check the Alternator Output
If your tester has alternator mode:
- Start the engine
- Turn ON the headlights and the AC
- Check voltage
A healthy alternator shows voltage between 13.7V to 14.7V.
If it’s below 13V or above 15V, you may have alternator issues.
Step 7: Disconnect the Tester
Once readings are checked, remove the clamps in reverse order:
Black clamp first
Red clamp second
Close the bonnet properly and you're done!
Common Mistakes People Make While Using a Battery Tester
Even though testing is simple, many people make small mistakes that lead to wrong readings:
- Testing the battery with ignition ON
- Placing clamps loosely
- Testing immediately after turning off the engine
- Ignoring corrosion on terminals
- Using cheap testers with inaccurate readings
Always follow safe steps for a correct voltage reading.
When Should You Test Your Car Battery?
You must use a car battery tester when:
- The car is cranking slowly
- Headlights appear dim
- The battery is older than 2.5–3 years
- The car hasn’t been used for many days
- You feel the alternator is not charging properly
Regular testing every month reduces the chances of sudden battery failure.
CarVaidya Tip: Get a Professional Battery Inspection
Even though using a battery tester at home is easy, many people still prefer a quick professional check. Services like CarVaidya provide complete battery health inspection along with alternator and wiring checks. This helps you catch issues early and keep your car running without surprises.
A car battery tester is one of the most handy tools for every car owner. With the simple steps explained above, you can
easily check your battery’s health, understand voltage levels, and avoid breakdowns. Whether you're learning how to use a battery meter or want the best method to use a battery voltage checker, these steps will guide you properly. Testing your battery regularly saves time, money, and avoids getting stranded suddenly. Make it a small part of your monthly car maintenance routine.
 By CarVaidya
0 Comments