When your car’s air conditioner stops cooling properly, it could be due to incorrect refrigerant pressure. One of the best ways to diagnose this issue is by
using an AC pressure gauge. This handy
car AC check device helps you read refrigerant levels, find leaks, and identify whether your AC system needs refilling or servicing. In this blog, we’ll explain how to use an AC pressure gauge step-by-step so you can easily test and maintain your car’s cooling system at home.
What is an AC Pressure Gauge and Why It’s Important
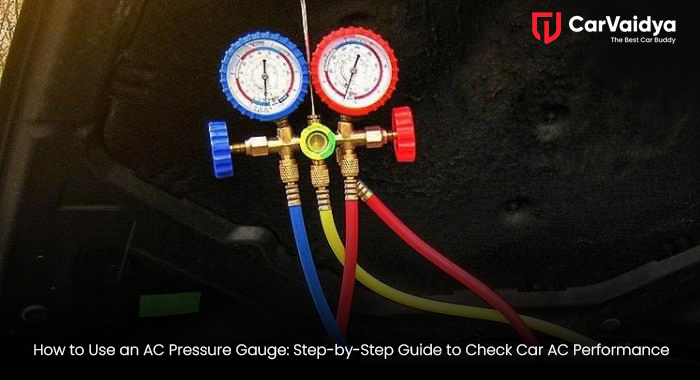
An AC pressure gauge (also called an AC manifold gauge set) is a car AC diagnostic tool that measures the pressure on both the high and low sides of the air conditioning system. It helps detect if there’s too little or too much refrigerant in your system. Without correct pressure, your AC won’t cool efficiently. Low pressure may mean the refrigerant is leaking, while high pressure could mean blockage or overfilled gas. That’s why every car owner who cares about automotive AC maintenance should know how to check car AC pressure using this tool.
Tools You’ll Need
Before you begin, gather these tools:
- AC manifold gauge set (includes low and high-pressure gauges)
- Refrigerant pressure tester
- Protective gloves and goggles
- Car service manual (for recommended refrigerant type and pressure range)
- Refrigerant can (if refilling is needed)
Step 1: Locate the AC Service Ports
Open your car’s hood and locate the low-pressure and high-pressure service ports of your AC system.
- The low-pressure port is usually found on the thicker aluminum pipe.
- The high-pressure port is located on the thinner pipe near the condenser.
These ports are generally labeled “L” (blue) for low and “H” (red) for high. Understanding AC gauge color codes is essential — blue is for low pressure, and red is for high pressure.
Step 2: Attach the AC Manifold Gauge Set
Now, connect your AC manifold gauge set correctly
- Attach the blue hose to the low-pressure port.
- Attach the red hose to the high-pressure port.
- The yellow hose connects to the refrigerant can or vacuum pump (depending on what you’re doing — checking, vacuuming, or refilling).
This setup is called an AC manifold gauge connection, and it’s crucial to ensure all connections are tight to prevent refrigerant leaks.
Step 3: Start the Engine and Turn On the AC
Start your car’s engine and turn the air conditioning to the maximum cooling mode. Let it run for a few minutes so the system reaches its normal operating pressure. This will help the car AC pressure testing tool provide accurate readings. Make sure the compressor is running; if not, you may have a deeper car AC troubleshooting issue.
Step 4: Read the Pressure Values
Check both gauge readings carefully
- Low-pressure side (blue gauge): Normally between 25–45 psi
- High-pressure side (red gauge): Normally between 200–250 psi
These values can vary slightly based on the car model and ambient temperature. Refer to your manual for the ideal AC refrigerant pressure range. If the pressure is too low, your system might be undercharged or leaking. If it’s too high, it could indicate overcharging or a blocked condenser. This is the essence of a car AC pressure reading guide — understanding what each value means helps in accurate diagnosis.
Step 5: How to Refill AC Gas Using a Gauge
If your readings show low refrigerant, you can refill the AC gas using the gauge easily.
- Turn off the engine.
- Connect the yellow hose to the refrigerant can.
- Start the engine again and open the low-pressure valve slowly.
- Allow refrigerant to flow into the system while monitoring the gauge.
- Close the valve once the pressure reaches the recommended level.
Never open the high-pressure valve while refilling, as it can cause refrigerant to backflow and damage the compressor.
Step 6: Check for Leaks and Cooling Performance
After refilling, use your
car AC inspection tool to confirm there’s no leak. You can also use soapy water on joints — bubbles will appear if there’s leakage.Then, check your car’s cooling inside the cabin. If the air is cold and steady, congratulations — you’ve successfully used an
AC check device to fix your AC issue!
Step 7: Disconnect the Gauges
Once done, turn off the car and disconnect the hoses in reverse order — red first, then blue. Keep the manifold set in a safe, clean place for next use. Proper handling of the AC manifold gauge set ensures long tool life and accurate future readings.
Common Mistakes to Avoid
- Not wearing protective gear while handling refrigerant.
- Mixing different refrigerant types.
- Opening the high-pressure valve during refill.
- Forgetting to check the compressor operation before diagnosis.
Avoiding these mistakes ensures safe and accurate car AC system testing.
Why a Regular AC Check Is Important
Your car’s air conditioning system loses about 10–15% refrigerant every year naturally.
Regularly checking it with an AC gauge helps maintain cooling efficiency, prevents compressor damage, and saves you from costly repairs later.
If you notice weak cooling, strange noises, or warm air, don’t ignore them. Early car AC troubleshooting using a refrigerant pressure tester can fix minor issues before they become major.
Learning how to test a car's AC system using a pressure gauge isn’t complicated — it’s about understanding the basics and being careful. By following these steps, you can inspect your AC system like a pro and even perform minor fixes at home.
 By CarVaidya
0 Comments