Tires are one of the most important components of your vehicle. They are the most effective parts of your car that make contact with the street, and their condition without delay impacts your protection, gasoline efficiency, and driving revel. Conducting regular tire inspections can help prevent accidents, reduce repair prices, and expand the lifespan of your tires. Here’s a complete guide on a way to carry out a protection inspection for your tires.
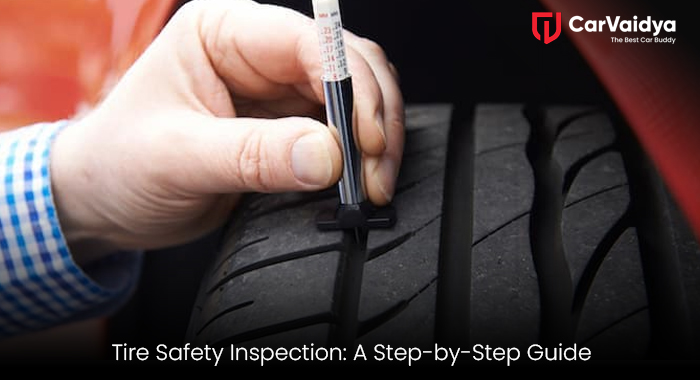
1. Check Tire Pressure
Proper tire pressure is critical for safe driving and top-rated gas efficiency. To test your tire stress:
- Use a Tire Pressure Gauge: Purchase a reliable tire strain gauge from a car keeper.
- Refer to the Manufacturer’s Recommendations: Find the recommended tire pressure in your car within the proprietor’s guide or on a sticker inside the driver’s door frame.
- Measure the Pressure: Remove the valve cap, connect the gauge, and be aware of the reading. Compare it to the endorsed level.
- Adjust as Needed: Inflate or deflate the tires to shape the advocated strain.
Check the tire pressure at a minimum once a month and before long journeys, as temperature changes can affect the strain.
2. Inspect Tread Depth
Tread intensity is critical for traction and dealing with, in particular on moist or slippery roads. To test tread depth:
- Use a Tread Depth Gauge: Insert the gauge into the tread and take a look at the size. A depth of 2/32 inch or less way the tire wishes substitute.
- Try the Penny Test: Insert a penny into the tread groove with Lincoln’s head dealing with down. If you can see the top of Lincoln’s head, the tread is simply too shallow.
- Look for Wear Indicators: Modern tires regularly have tread put-on indicators—raised bars in the grooves—that grow to be flush with the tread when it’s time for a substitute.
3. Examine for Visible Damage
Inspect the tire floor for
- Cuts or Punctures: Sharp items like nails or glass can motivate leaks or blowouts.
- Bulges or Blisters: These can imply internal harm and might result in a tire failure.
- Cracks: Cracks in the sidewall or tread can be a sign of growing older or degradation.
If you do any huge harm, seek advice from an expert immediately.
4. Check for Uneven Wear
Uneven wear styles can signal alignment troubles, improper inflation, or suspension issues. Examine:
- Center Wear: Overinflation causes the middle of the tire to be put on quickly.
- Edge Wear: Underinflation ends in greater wear on the rims.
- Cupping or Scalloping: This can also imply suspension troubles or an imbalance.
Address choppy put on directly to keep away from similar harm and make sure safe dealing with.
5. Inspect the Sidewalls
The sidewalls of your tires are critical for structural integrity. Look for:
- Cuts or Gouges: These can weaken the tire and lead to a blowout.
- Bubbles or Bulges: Often because of effect harm, these are extreme protection hazards.
- Dry Rot: Tiny cracks in the sidewall might also suggest getting old and the want for a substitute.
6. Check the Valve Stems
Valve stems are small however essential components. Inspect them for:
- Cracks or Damage: A damaged valve stem can cause air leaks.
- Cap Presence: Ensure the valve cap is a gift and secured to preserve dust and moisture.
7. Ensure Proper Tire Rotation
Rotating your tires frequently guarantees even put on and extends their lifespan. Follow the manufacturer’s pointers for rotation durations, normally each five,000 to 7,500 miles. Proper rotation patterns range with the aid of car type (e.g., the front-wheel drive, rear-wheel pressure, or all-wheel power).
8. Check the Wheel Alignment
Misaligned wheels can cause choppy tires put on and affect handling. Signs of misalignment consist of:
- The automobile pulls to at least one side.
- Uneven tread put on.
- A crooked steerage wheel when driving instantly.
Have your alignment checked with the aid of a professional in case you observe those issues.
9. Monitor Tire Age
Tires degrade over time, even though they have lots of treads left. Check the manufacturing date stamped at the sidewall (e.g., DOT code). Replace tires that might be over six years old, regardless of their situation.
10. Listen for Unusual Noises
Unusual noises, along with thumping or humming, can indicate tire or wheel issues. These may encompass:
- Imbalances.
- Damage or deformities.
- Alignment troubles.
11. Inspect After Seasonal Changes
Extreme temperatures can affect tire performance. Check your tires after large weather changes to ensure foremost protection.
Regular tire inspections are a simple but powerful manner to ensure your safety on the street. By following those steps, you can discover ability issues early, store money on upkeep, and experience a smoother riding experience. Always cope with any worries directly, and seek advice from an expert whilst unsure. Remember, well-maintained tires are key to a safe and efficient journey.
You can read some other articles
5 Easy Ways to Fix Scratches on Your Car's Touch Screen
DIY Guide: Changing Your Car's Air Filter
Car Mileage: Understanding and Optimizing Fuel Efficiency
 By CarVaidya